Very good offical Angular video explaining reasons why the dreaded error might occur and solutions.
Category: Angular
Rxjs debugging subscribers
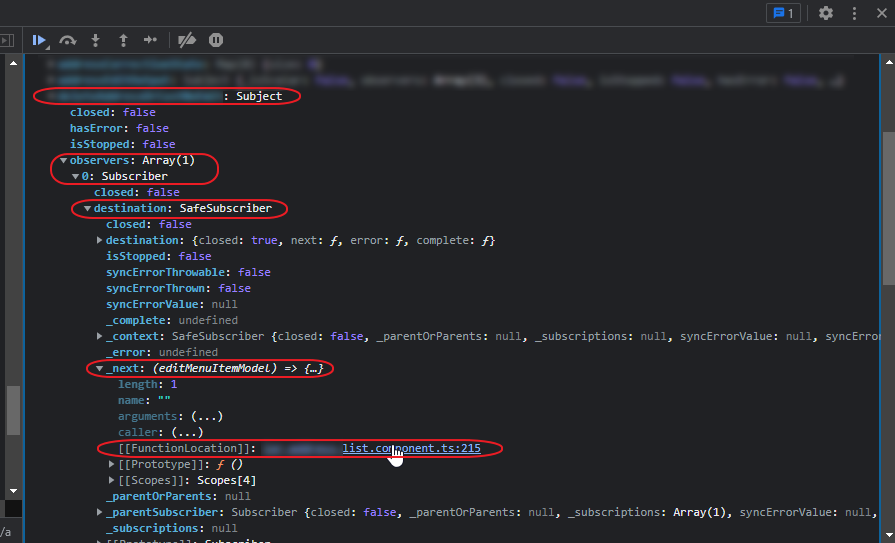
I wanted to see how many listeners there was for a certain subject, and where they reside in the source code.
Here is how in chrome devtools, put a breakpoint before the subjects .next() call. And inspect the subject:

observers array count = number of “listeners”
FunctionLocation = source code reference
(Context: Angular v11, rxjs)
Introduction to Angular Storybook – a tool for component UI development
Introduction to Storybook for Angular Storybook is a tool for UI development. It makes development faster and easier by isolating components. This allows you to work on one component at a time. You can develop entire UIs without needing to start up a complex dev stack, force certain data into your database, or navigate around your application.
Source: Introduction to Storybook
A simpler and smaller Angular starter project
A lot of complaints I heard when starting with Angular are about the sheer amount of files you get even on simple apps. When looking at the default starter template you get from Angular CLI’s
ng newcommand, it’s true that it can be a bit overwhelming if you’re not used to it.But it doesn’t have to always be that way. In this article, we’ll explore how we can create a smaller and simpler template that’s also easier to grasp for beginners, following the YAGNI principle.
(Angular version 14)
Source: A simpler and smaller Angular starter with ngLite – DEV Community
Use of Enums in Angular 8+ HTML template
in the TS
import { SomeEnum } from 'path-to-file';

public get SomeEnum() {
  return SomeEnum;
}
in the HTML use
*ngIf="SomeEnum.someValue === 'abc'"
EDIT: Time goes by and we learn more as a developer, the approach I’m using right now doesn’t use the get method. Both solutions work, just choose the one you like the most.
in the TS
import { SomeEnum } from 'path-to-file';

export class ClassName {
  readonly SomeEnum = SomeEnum;
}
in the HTML use
*ngIf="SomeEnum.someValue === 'abc'"From: Use of Enums in Angular 8 HTML template for *ngIf – Stack Overflow
Angular – How to force reload components with router navigation
(Tested in Angular 11 project)
One trick is to “double” navigate to force components to destroy and “update” their lifecycle.
E.g.:
/// Navigates to detail view
navigateToDetail(id: string) {

  // Navigates to start page first to "destroy" detail components if on same url
  this.router.navigate(['/']).then(() => {
    // Then navigates to desired url
    let navigationExtras: NavigationExtras = { queryParams: { 'id': id} };
    this.router.navigate(['/view'], navigationExtras);
  });

}
I also added this to app-routing.module.ts: (not sure if it makes a difference with the above code)
@NgModule({
  imports: [RouterModule.forRoot(routes, {
    onSameUrlNavigation: 'reload',
  })],
  exports: [RouterModule],
})
export class AppRoutingModule {}
How to force Angular to reload components when navigating to same url
Tested in Angular 11:
In module config for route module:
@NgModule({
imports: [RouterModule.forRoot(routes, {
onSameUrlNavigation: 'reload',
})],
exports: [RouterModule],
})
Set onSameUrlNavigation to ‘reload’
Whan using router.navigate() force url to update by adding a unique query parameter:
let navigationExtras: NavigationExtras = {
  queryParams: {
     refreshToken: (new Date).getTime(); //pass a dummy parameter (i.e. the time in milliseconds since 1970 or use the npm uuid library), forces reload of unique url
  },
};
this.router.navigate(['/detail'], navigationExtras);
More info:
https://github.com/angular/angular/issues/13831
Angular 10+ Strict Mode
From Angular 10 (experimental) / 11 (default on create new app) you can get strict mode. In summary it reduces the bundle size (by 75%!) and increases the maintainability by disabling you to create objects of type ‘any’ (no untyped types)…
Angular 11+ CLI creates all new workspaces and projects with strict mode enabled.
Strict mode improves maintainability and helps you catch bugs ahead of time. Additionally, strict mode applications are easier to statically analyze and can help the
ng updatecommand refactor code more safely and precisely when you are updating to future versions of Angular.Specifically, strict mode does the following:
-
Enables
strictmode in TypeScript, as well as other strictness flags recommended by the TypeScript team. Specifically,forceConsistentCasingInFileNames,noImplicitReturns,noFallthroughCasesInSwitch. -
Turns on strict Angular compiler flags
strictTemplates,strictInjectionParametersandstrictInputAccessModifiers. -
Bundle size budgets have been reduced by ~75%.
More info:
https://angular.io/guide/strict-mode
Angular CLI Strict Mode. In Angular, we strongly believe in… | by Minko Gechev | Angular Blog
Set Prettier as default formatter in WebStorm
Source: Prettier—WebStorm
Angular state inspector – Chrome Extension
Helps you debug Angular component state. Supports Angular 1/2+/Ivy! Angular State Inspector for Angular Supports all versions of Angular: – AngularJs – Angular 2+ – Angular Ivy – Hybrid apps (AngularJs + Angular) Extends the Chrome Developer Tools for Angular web apps. Adds new panel “State” to Elements tab, that displays the state of selected element. Prints state of selected element in console by calling “$state” variable. Depending on angular version it can show: – Component state – Directives – Context, like ngForOf or ngIf values – Event listeners If they are applicable to the current element.
Angular State Inspector also allows you to modify the values in the “State” panel (double click on value)