This runs all spec files that are descendants of the “my-area” folder and in the “Edge” browser.
ng test --include "src/app/my-area/**/*.spec.ts" --browsers=Edge
My bookmarks and blogposts regarding Software Development in .NET, C#, Angular, JavaScript, CSS, Html
This runs all spec files that are descendants of the “my-area” folder and in the “Edge” browser.
ng test --include "src/app/my-area/**/*.spec.ts" --browsers=Edge
Angular v19 will make standalone: true the default for components, directives, and pipes.In v14 we introduced a developer preview “standalone” feature, which made it possible for the first time to build an application that didn’t rely on NgModules. Since then, standalone has been stabilized, and has become the recommended way to write Angular code by the Angular team. The CLI generates components with standalone: true by default, and the Angular docs teach standalone first to all new Angular developers. A
Validating user input in HTML forms can be a tedious task. In this new series, we’ll look at how Angular can help us implement painless form validation. First, it’s essential to know that Angular relies primarily on native browser validation features that use modern HTML properties. For instance, if a form field has to be filled out, you can mark it as required using the required HTML attribute
Source: Basic form validation with Angular | Angular Newsletter
In this tutorial, we’re going to implement a polling mechanism using RxJs and Angular. Our goal is to retrieve and render information that gets refreshed periodically. Our example is going to be a currency service that displays up-to-date currency exchange rates
Source: How to do polling with RxJs and Angular? | by Alain Chautard | Angular Training
Another way to put it is that you don’t want to end up doing something like this:
<p>First name: {{ (user$ | async)?.firstName }}</p>
<p>Last name: {{ (user$ | async)?.lastName }}</p>
Code language: HTML, XML (xml)
The above code is pretty hard to read and requires one subscription for each property. This alone can be a disaster, as each subscription might trigger an HTTP request for the same data from the server!
Instead, you can do something like this, which uses only one subscription, stores the result in a local variable, then renders the data when it’s available. This technique works with any structural directive, such as *ngIf
or *ngFor
:
<div *ngIf="user$ | async as user">
<p>First name: {{ user.firstName }}</p>
<p>Last name: {{ user.lastName }}</p>
</div>
I am using Angular v17 and node v18.
In simple steps;
Goto azure portal.
Create a new resource of type “Static Web App”
I choose Github as Deployment source.
Regarding Angular v17, I had problems with the github deployment build actions:
After Azure has created the static web app for Github deployment the following file is pushed into the repo:
.github/workflow/azure-static-web-apps-[*].yml
I hade to set the following values correctly:
app_location: "./" # App source code path
output_location: "./dist/gps-tracker/browser" # Built app content directory - optional
The output location should point to where the index.html file is located.
You should change the ‘gps-tracker’ to your application name. To find out exactly run ‘ng build’ locally and look into the created dist folder.
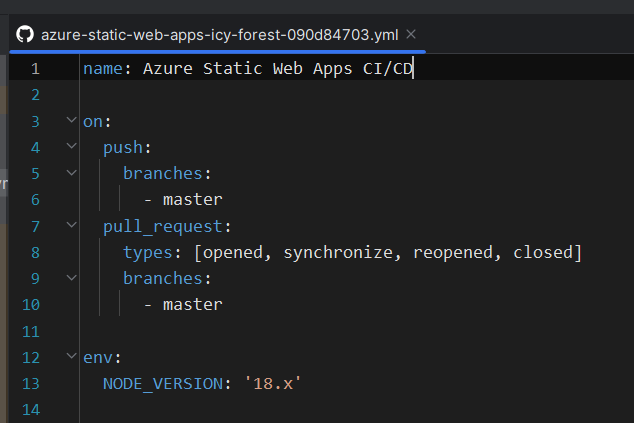
Regarding setting node version to 18: I added the following in the yml file:
env: NODE_VERSION: '18.x'
Print screen of node version setting:
A complete guide on how to use Signals in an Angular application. Learn signals, their benefits, best practices, and patterns, and avoid the most common pitfalls.
Source: Angular Signals: Complete Guide
So now how about listening to events on the host element that wraps the component’s template? How can we do that properly in Angular apps? That’s the very question we will answer in this article. Before diving directly into listening to DOM events on a host element, I think we need to touch on what a host element is. The concept of host element applies not only to components but also attribute directives.
Source: Four ways of listening to DOM events in Angular (Part 2: @HostListener)
To run component tests only for a certain browser and spec file use this command:
ng test --browsers=Chrome --include=**/detail.component.spec.ts
Enables clicking on Angular selectors in your HTML files and being redirected to their component definition, as well as the other way around by clicking on templateUrl and styleUrls in your component.