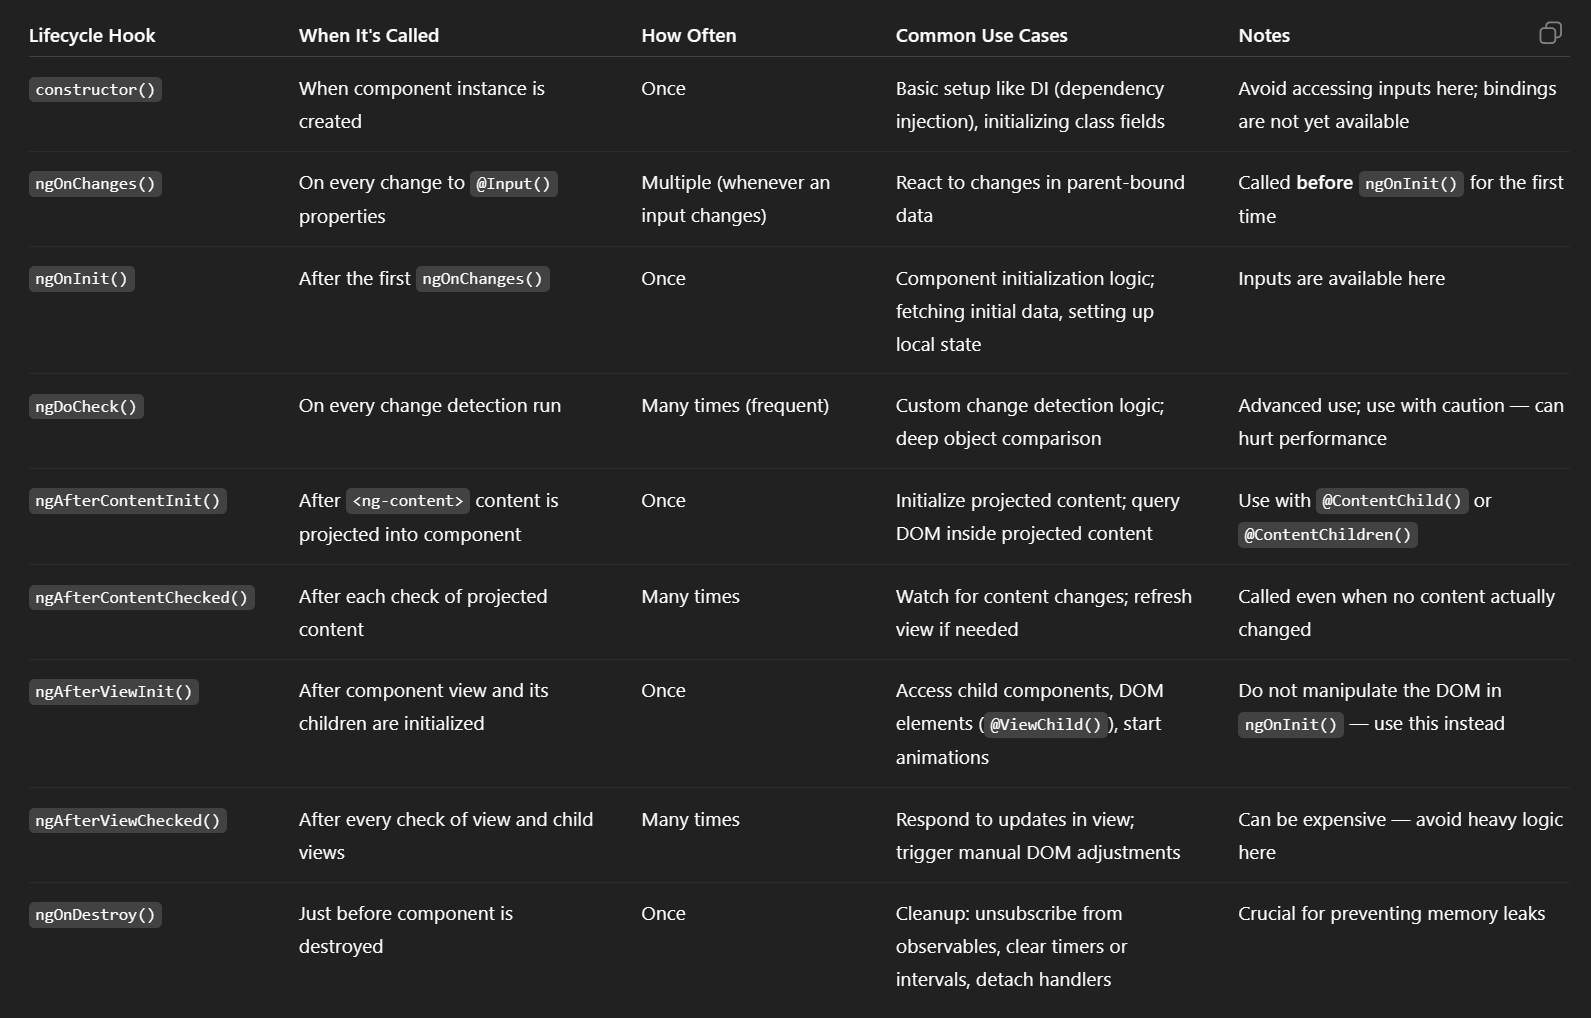
Above was created by ChatGPT 2025-06-13
My bookmarks and blogposts regarding Software Development in .NET, C#, Angular, JavaScript, CSS, Html
Above was created by ChatGPT 2025-06-13
Testing Components with children
- Rendering a Component with or without its children
- Checking that the parent and its children are wired up correctly
- Replacing child Components with fakes
- Using the ng-mocks library to fake dependencies
setTimeout, Promise.then, or an asynchronous observable, or update the property in a lifecycle hook before the DOM update.
setTimeout, Promise.then, or Asynchronous Observable:
setTimeout, Promise.then, or an asynchronous observable (like RxJS). setTimeout(() => { this.myProperty = newValue; }, 0); Promise.resolve().then(() => { this.myProperty = newValue; }); fromEvent(document, 'click').subscribe(() => { this.myProperty = newValue; });ngOnInit, ngAfterContentInit, or ngAfterViewInit.
ChangeDetectorRef into your component and use detectChanges() to manually trigger change detection.
detectChanges and the checkNoChanges checks.
The problem
You want to write maintainable tests for your Angular components. As a part of this goal, you want your tests to avoid including implementation details of your components and rather focus on making your tests give you the confidence for which they are intended. As part of this, you want your testbase to be maintainable in the long run so refactors of your components (changes to implementation but not functionality) don’t break your tests and slow you and your team down.
This solution
The
Angular Testing Libraryis a very lightweight solution for testing Angular components. It provides light utility functions on top ofDOM Testing Libraryin a way that encourages better testing practices. Its primary guiding principle is:The more your tests resemble the way your software is used, the more confidence they can give you.
So rather than dealing with instances of rendered Angular components, your tests will work with actual DOM nodes. The utilities this library provides facilitate querying the DOM in the same way the user would. Finding form elements by their label text (just like a user would), finding links and buttons from their text (like a user would). It also exposes a recommended way to find elements by a
data-testidas an “escape hatch” for elements where the text content and label do not make sense or is not practical.This library encourages your applications to be more accessible and allows you to get your tests closer to using your components the way a user will, which allows your tests to give you more confidence that your application will work when a real user uses it.
.NET Core 8 have built-in API rate limiter functionality.
Can be used in an API project like this in program.cs:
app.UseRateLimiter();

//(PUT BELOW CODE AFTER LINE: var app = builder.Build();)
//Setup API request rate limiter
//If a rate limit is exceeded in ASP.NET Core's Rate Limiting Middleware
//HTTP response will have the status code: 429 Too Many Requests
builder.Services.AddRateLimiter(options =>
{
    options.AddFixedWindowLimiter(
        "default",
        limiterOptions =>
        {
            limiterOptions.PermitLimit = 10; // Allow 10 requests
            limiterOptions.Window = TimeSpan.FromSeconds(1); // Per second
            limiterOptions.QueueProcessingOrder = QueueProcessingOrder.OldestFirst;
            limiterOptions.QueueLimit = 2; // Allow 2 queued requests
        }
    );
});
Angular evolves for every version. Here is a good website that gives a clear overview which Angular APIs are in experimential, developer, stable or depracated state. Reminds a bit of the html/css/js caniuse.com web. (focus more on cross browser compability though).
Source: Angular CanIUse feature roadmap
When facing a performance issue, the Profiler is perfect for identifying the problem’s root cause. For instance, it could highlight that one component is much slower than the others and gets refreshed for no good reason, indicating that a different change detection strategy is needed.
Source: Angular profiler for performance tuning | Angular Newsletter
Directives such as *ngIf and *ngFor will soon get deprecated to favor the new control flow blocks.
E.g. old directives:
<ng-container *ngIf="isLoggedIn">...</ng-container>
Can now be replaced with the new syntax:
@if (isLoggedIn) {
   ...
}
ShellMenuNew is a small utility that displays the list of all menu items in the ‘New’ submenu of Windows Explorer. It allows you to easily disable unwanted menu items, so this ‘New’ submenu will display only the items that you need.
Source: ShellMenuNew – Disable/enable ‘New’ menu items in Windows Explorer