# Output environment variables
- bash: |
    echo "===== Environment Variables (sorted) ====="
    env | sort
  displayName: "List environment variables"
Above will not list library (enviroment) variables marked as secret.
My bookmarks and blogposts regarding Software Development in .NET, C#, Angular, JavaScript, CSS, Html
# Output environment variables
- bash: |
echo "===== Environment Variables (sorted) ====="
env | sort
displayName: "List environment variables"
Above will not list library (enviroment) variables marked as secret.
Create an Application Insights Resource in Azure:
– Go to the Azure portal, “Create a resource”, search for “Application Insights” and create.
Install the Application Insights SDK in Your .NET Core 8 Project:
– Open your .NET Core API project.
– Install the `Microsoft.ApplicationInsights.AspNetCore` NuGet package
Configure Application Insights in Your Project:
– Open the `appsettings.json` file and add your Application Insights Instrumentation Key:
{
       "ApplicationInsights": {
         "InstrumentationKey": "your_instrumentation_key_here"
       }
}
The instrumentation key can be found in azure portal on the application insight resource “Overview tab”, the label “Instrumentation Key” in top right.
– Alternatively, you can set the instrumentation key in the environment variables.
Add the Application Insights telemetry
Modify the `Program.cs` file:
using Microsoft.ApplicationInsights.Extensibility;
...

// Add Application Insights telemetry
builder.Services.AddApplicationInsightsTelemetry();

// Configure logging to include Application Insights
builder.Logging.AddApplicationInsights();

//Write log message
var logger = builder.Services.BuildServiceProvider().GetRequiredService<ILogger<Program>>();
logger.LogInformation("Logging init");
...

var app = builder.Build();
//Write log message to indicate logging is working
app.Logger.LogInformation("Logging init");
...
Set logging level to information and add logging message:
Default logging level for Application Insights logger is “warning”, here is how to change the level to include “information” as well.
Method 1: in appsettings.json file:
{
...
  "Logging": {
    "LogLevel": {
...
    },
    "ApplicationInsights": {
      "LogLevel": {
        "Default": "Information",
        "Microsoft": "Warning",
        "Microsoft.Hosting.Lifetime": "Information"
      }
    }
  }
}
Method2: Configure Logging Level in Program.cs
// Add Application Insights telemetry
builder.Services.AddApplicationInsightsTelemetry();

// Configure logging to include Application Insights
builder.Logging.AddApplicationInsights();

// Set the logging level to Information
builder.Logging.AddFilter<Microsoft.Extensions.Logging.ApplicationInsights.ApplicationInsightsLoggerProvider>("", LogLevel.Information);
Verify Telemetry Collection logging
– Run your application, the logging “Logging init” should have been logged.
– Go back to the Azure portal, navigate to your Application Insights resource, and check the “Live Metrics Stream” or “Logs” to verify that telemetry data is being collected. E.g. filter for “traces” in the query and the “Logging init” LogInformation() call should be present.
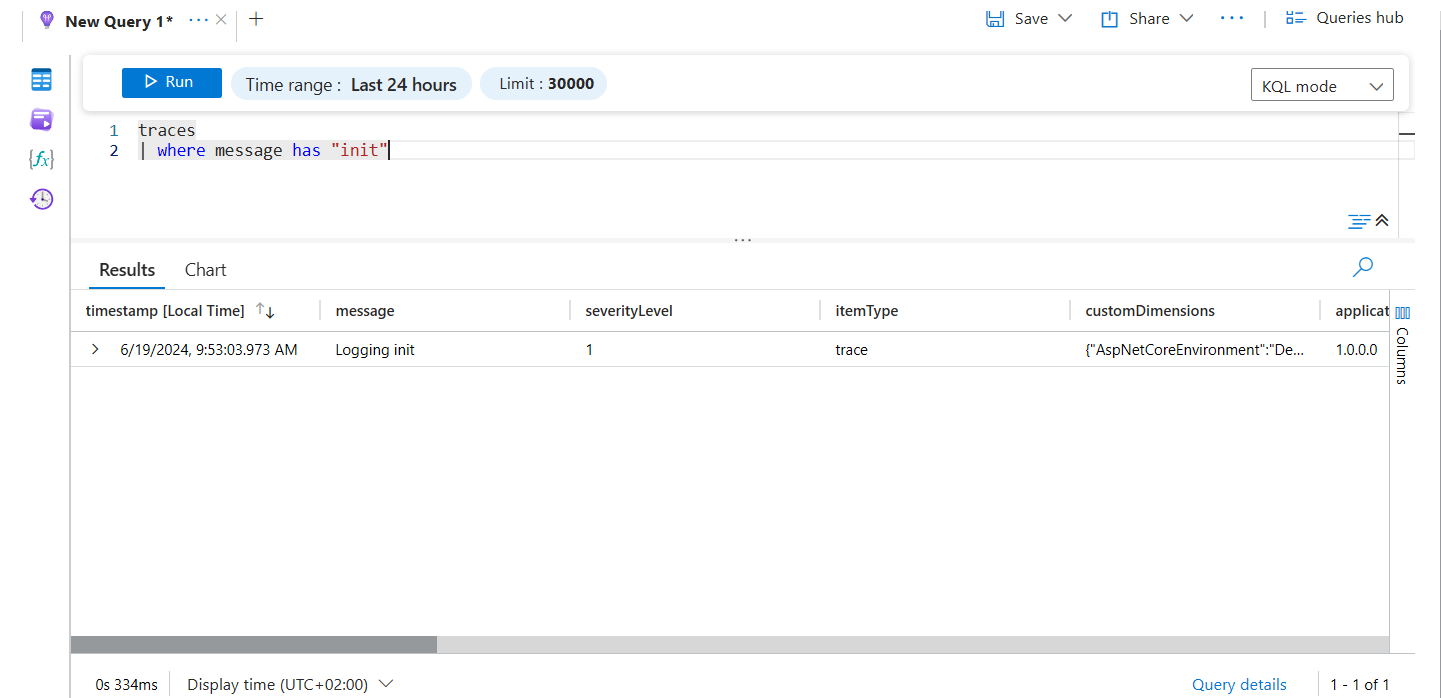
Example log query:
traces
 | where message has "init"
Example of more advanced log query:
traces
| where timestamp > ago(2h) // Adjust the time range as needed
| where severityLevel >= 1 // 1 corresponds to Information level and above
| project timestamp, message, severityLevel
| order by timestamp desc
Set the timestamp presentation to Swedish time
If you are in non English country you might want to change the time presentation and the local time zone default settings.
Set regional format for Azure Portal:
Click the user menu in top right: select “View account”:
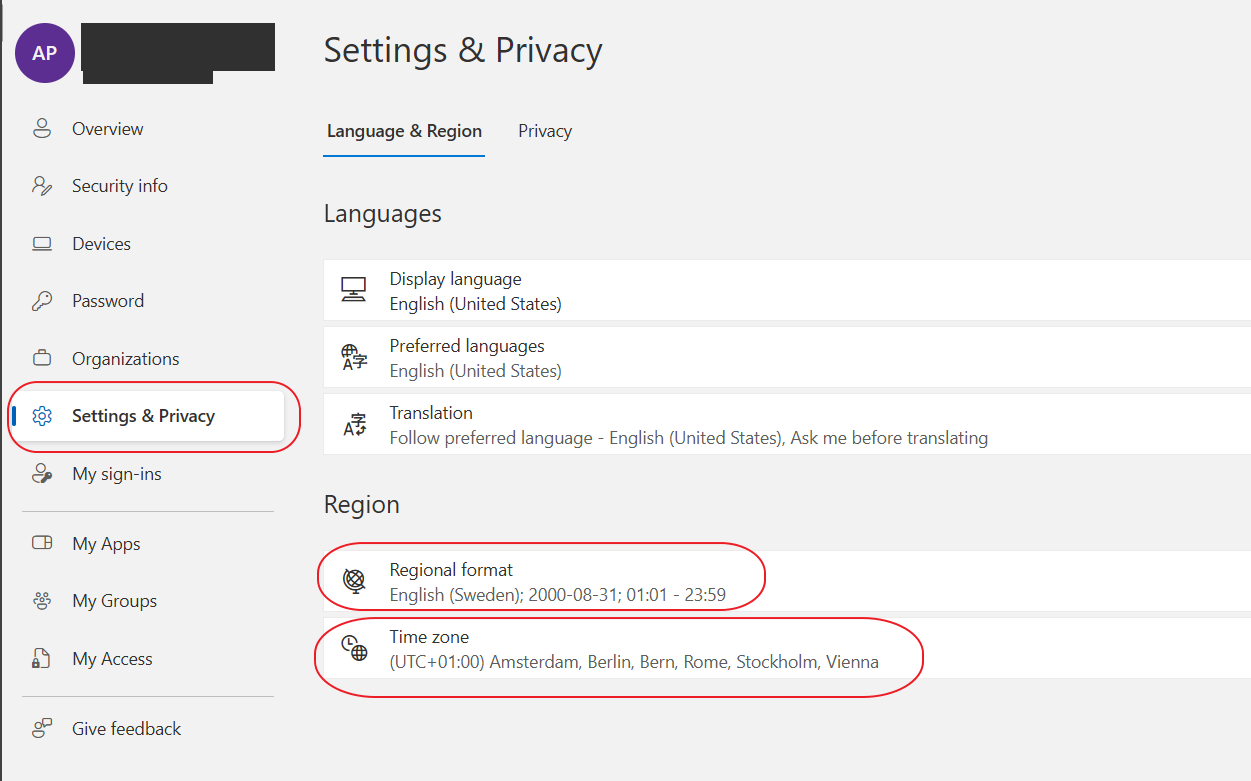
Select “settings..” tab, set regional format and time zone.
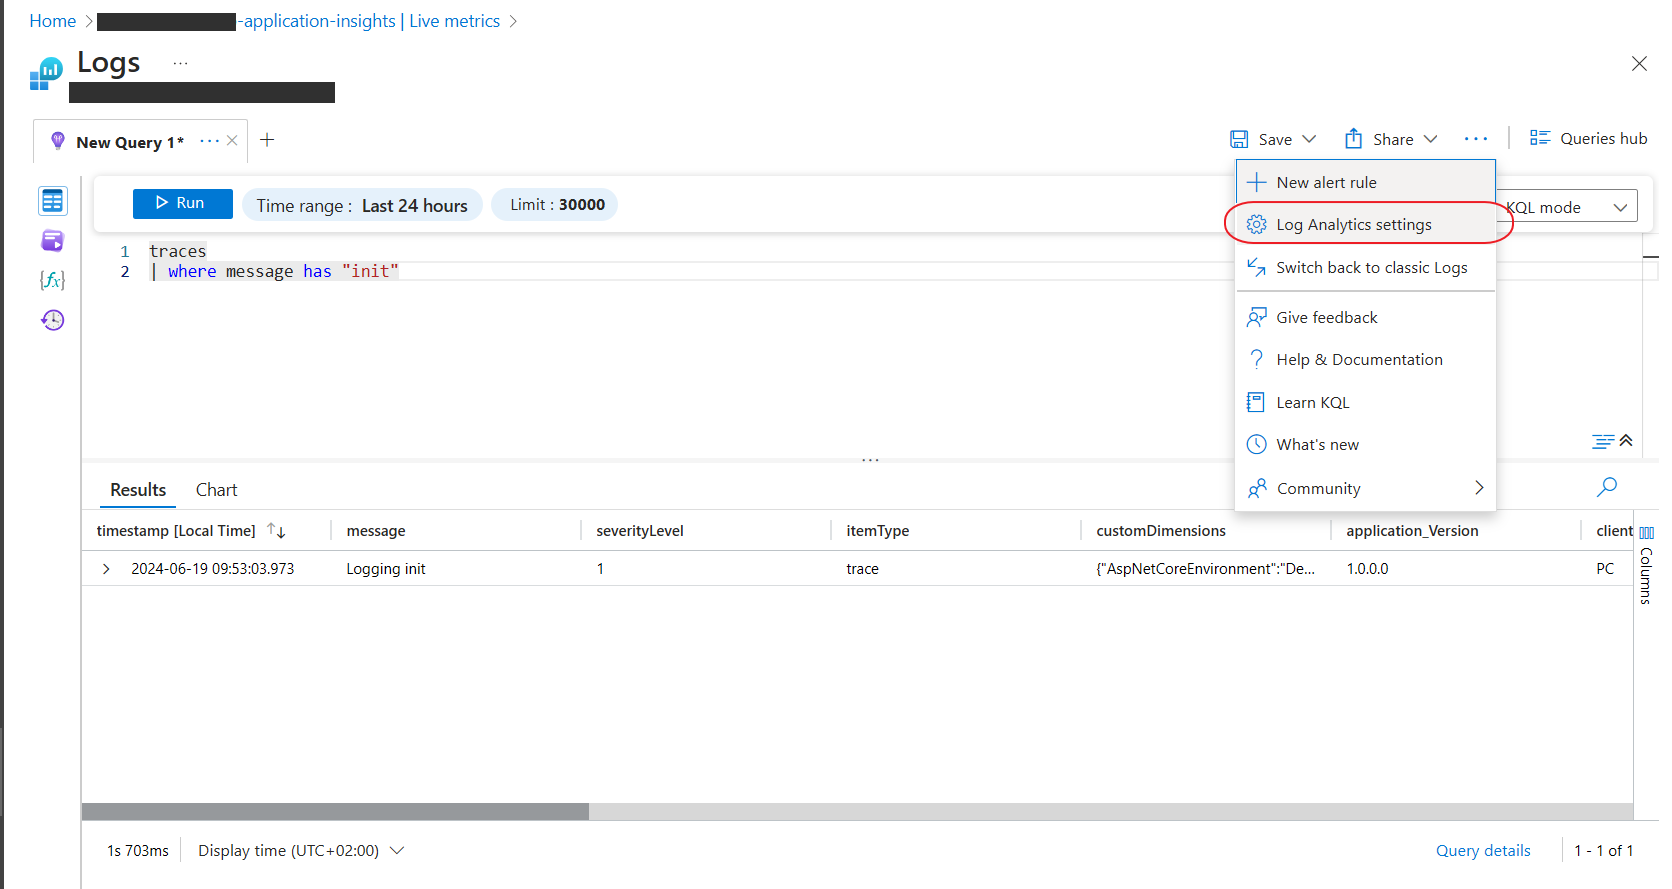
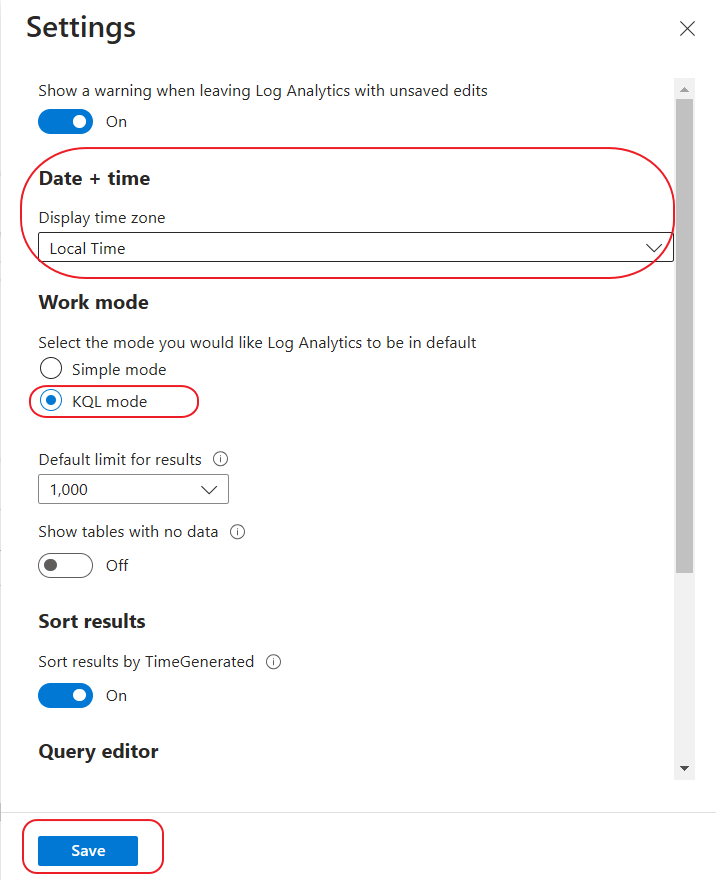
Set local time zone as default for the log view:
I am using Angular v17 and node v18.
In simple steps;
Goto azure portal.
Create a new resource of type “Static Web App”
I choose Github as Deployment source.
Regarding Angular v17, I had problems with the github deployment build actions:
After Azure has created the static web app for Github deployment the following file is pushed into the repo:
.github/workflow/azure-static-web-apps-[*].yml
I hade to set the following values correctly:
app_location: "./" # App source code path
output_location: "./dist/gps-tracker/browser" # Built app content directory - optional
The output location should point to where the index.html file is located.
You should change the ‘gps-tracker’ to your application name. To find out exactly run ‘ng build’ locally and look into the created dist folder.
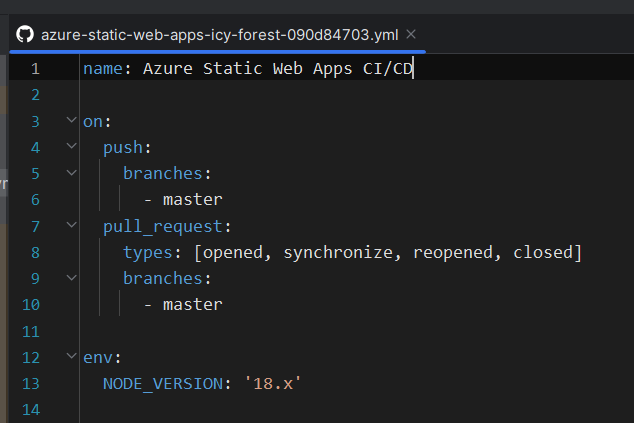
Regarding setting node version to 18: I added the following in the yml file:
env:
  NODE_VERSION: '18.x'
Print screen of node version setting:
Clearing the cached credentials from Credential Manager. And then try again.Go to Credential Manager–> Windows Credentials–> Generic Credentials–>Remove all Git related credentials.
You can test out a simple HTML/Angular/front-end/ASP.net/nodejs based website real quick and simple on Azure for free.
Steps:
(This is what i did to test out an Angular app real quick)
Next, next, when finished on the App Service “Overiew” tab you will see this information:
URL
FTP/deployment username
FTP hostname
FTPS hostname
Use it to deploy the website with your favorite FTP client.
Deploy to folder /site/wwwroot on the server.
See this post regarding setting up FTP access credentials: http://blog.wsoft.se/2018/04/20/accessing-azure-web-app-with-ftp/
How to fix authentication in Sourcetree with Azure Repos
You will try, and think you are not successful, but you are really near from it ! follow with me:
I am using SourceTree for Windows version 3.2.6
1- Tools -> Options -> Authentication
2- Remove all Visual Studio (or DevOps). Click Ok.
3- Close SouceTree completely. I closed Visual Studio as well, just in case !
3.5 – I switched to DevOps format from Organization settings in DevOps website. So, if you want to follow exactly what I did, do it. Currently it is possible to return back to old format xxx.visualstudio.com. It is your decision !
4- Open SourceTree, go again to Tools -> Options -> Authentication.
5- Enter Host URL as follows: https://dev.azure.com/YourOrgName
6- Prepare your new Personal Access Token, then click “Refresh Personal Access Token” button. Ensure you have this token saved somewhere TEMPORARILY because we will need it.
7- Enter your email as username, and the just generated PAT as password.
It will tell you it failed, do not worry it did not !
8- Click Ok then Close SourceTree Completely.
9- Remove the password cache file called “passwd” in “C:\Users\{YOUR_USER_NAME}\AppData\Local\Atlassian\SourceTree”.
10- Open sourcetree again. You can go again to Authentication of SourceTree and see your account has actually been added !
11- Ensure that your repository setting of your git is correctly formatted (https://dev.azure.com/YourOrgName/Project/_git/……)
12- You will notice a new password window shows up asking for password, Enter the same Token which you used it earlier. Note that this password will be cached. You might get the same window when you Fetch anther repository. That is why we saved the token temporarily.
13- Fetch your repos, it should work now. Congratulations !
14- Do not forget to remove the TEMPORARILY saved token (if you saved it somewhere) which can be stolen and used to access your account. I mean that copy-pasted token.
From source: Solved: Azure DevOps with Sourcetree – Adding a remote acc…
If you’re a .NET developer, we’re excited to introduce a new resource that can help you learn about Azure: The Azure Quick Start Guide for .NET Developers!
Initially imported into SQL Express 2014 but got some warnings/errors regarding the import, so SQL 2016 works better.
Steps:
1. Access to a bacpac file locally / on azure storage
2. Use the UI wizard in Management Studio. (See below)

Source: Import a BACPAC File to Create a New User Database | Microsoft Docs
Solved the error by setting TrustServerCertificate=false in the connectionstring.
More info here:
https://stackoverflow.com/questions/17615260/the-certificate-chain-was-issued-by-an-authority-that-is-not-trusted-when-conn